Main Settings
Retro3D Toolkit: Main Settings Guide
Welcome to the Main Settings panel of the Retro3D Toolkit, this is a short overview of the most commonly used settings while using this workflow. To save on both time and efficiency.
Common Controls:
| State | Description |
|---|---|
k |
Press k while in EDIT mode with a control point selected (curve ) to update mesh after move. |
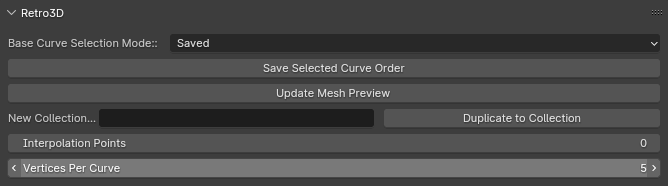
Base Curve Selection Mode
The Base Curve Selection Mode is a property group that allows you to control how the base curves are selected for various operations in your workflow. It provides four different selection modes to choose from, each serving a specific purpose.
Selection Modes
1. Selected
- Name: "Selected"
- Description: "Work with the currently selected curves in the 3D view"
- Functionality: This mode allows you to work with the currently selected curves in the 3D view. It is useful when you want to perform operations on a specific set of curves that you have manually selected.
2. Saved
- Name: "Saved"
- Description: "Work with a pre-saved set of curves"
- Functionality: In this mode, you can work with a pre-saved set of curves. This is handy when you have a predefined group of curves that you frequently use and want to quickly access them without having to select them each time.
3. Collection
- Name: "Collection"
- Description: "Work with curves that belong to a specific collection"
- Functionality: The collection mode allows you to work with curves that belong to a specific collection. This is particularly useful when you have organized your curves into different collections based on their purpose or characteristics. By selecting a collection, you can perform operations on all the curves within that collection.
4. 3DCURSOR PROXIMITY
- Name: "Proximity"
- Description: "Select curves based on their proximity to the 3D cursor"
- Functionality: This mode selects curves based on their proximity to the 3D cursor. It is helpful when you want to work with curves that are close to a specific point in 3D space. The proximity threshold can be adjusted to control the selection range.
Usage
To use the Base Curve Selection Mode, simply choose the desired mode from the dropdown menu in your add-on or tool's user interface. The available options are:

- "SELECTED": Selects the currently selected curves in the 3D view.
- "SAVED": Selects a pre-saved set of curves.
- "COLLECTION": Selects curves based on their collection.
- "3DCURSOR PROXIMITY": Selects curves based on their proximity to the 3D cursor.
The default mode is set to "SAVED".
Conclusion
The Base Curve Selection Mode provides a flexible way to control how curves are selected in your add-on or tool. By offering different selection modes, it allows you to work with curves based on their selection state, saved groups, collections, or proximity to the 3D cursor. Choose the mode that best fits your workflow and requirements.
Save Selected Curve Order
The object.save_order operator allows you to save the order of the currently selected curves. This is useful when you want to preserve a specific arrangement of curves for later use or reference.
To use this operator, select the desired curves in the 3D view and click the "Save Selected Curve Order" button in the Retro3D settings panel.
Update Mesh Preview
The object.create_preview_mesh_advanced operator updates the mesh preview based on the current curve selection and settings. It generates a preview mesh that represents the geometry that will be created when the final mesh is generated.
To update the mesh preview, click the "Update Mesh Preview" button in the Retro3D settings panel. The preview mesh will be generated using the selected curves and the current interpolation and vertex settings.
Duplicate to Collection
The object.duplicate_to_collection operator allows you to duplicate the selected curves to a new collection. This is helpful when you want to create a separate collection containing a specific set of curves for organizational or further processing purposes.
ATTENTION: PLEASE READ
This will only duplicate the selected curves that have been stored in the temporary collection when using the Save Selected Curve Order operator. Make sure you select and save the collection you want to duplicate prior to duplication! This is as by design!
To use this operator:
-
Enter a name for the new collection in the "New Collection Name" field.
-
Click the "Duplicate to Collection" button.
The selected curves will be duplicated and added to a new collection with the specified name. Not to worry if a collection does not exist, we will create one automatically for you place those curves within that collection.
Interpolation Points
The interp_points_count property controls the number of interpolation points that will be calculated between each pair of curves during the mesh generation process. It determines the smoothness and resolution of the resulting geometry.
The number of interpolation points directly affects the number of vertices generated for each pair of curves. For example: - If you have two curves and set the interpolation points to 1, the resulting geometry will have a total of three vertices: one vertex for each curve and one interpolated vertex between them. - If you have two curves and set the interpolation points to 10, the resulting geometry will have a total of 12 vertices: one vertex for each curve and ten interpolated vertices between them.
To adjust the number of interpolation points, change the value in the "Interpolation Points" field in the Retro3D settings panel. Keep in mind that higher values will result in smoother transitions between curves but will also increase the number of vertices and may impact performance and memory usage.
When deciding on the number of interpolation points, consider the desired level of smoothness and the complexity of your geometry. A higher number of interpolation points will produce more detailed and smoother results but may also increase processing time and resource requirements.
It's important to find a balance that provides sufficient smoothness while maintaining acceptable performance for your specific use case. Experiment with different values to find the optimal number of interpolation points that achieves the desired visual quality without sacrificing efficiency.
Vertices Per Curve
The vertices_per_curve property sets the number of vertices that will be generated for each individual curve when creating the mesh preview or the final mesh. It defines the level of detail and resolution of the resulting geometry.
The number of vertices per curve has a 1:1 ratio that scale equidistant for the length on each curve. This means that if you set the vertices_per_curve property to 10, each curve will have exactly 10 vertices evenly distributed along its length.
The distribution of vertices along the curve is uniform, ensuring that the vertices are evenly spaced. This uniform distribution allows for a consistent level of detail throughout the curve.
It's important to note that the first vertex of each curve is always placed at control point index 0. This guarantees that the starting point of each curve is accurately represented in the generated geometry.
To modify the number of vertices per curve, adjust the value in the "Vertices Per Curve" field in the Retro3D settings panel. Keep in mind that higher values will produce more detailed geometry but may also increase memory usage and processing time.
When choosing the number of vertices per curve, consider the desired level of detail and the complexity of your curves. A higher number of vertices will provide more fine-grained control over the shape of the curve but will also result in a larger number of total vertices in the generated mesh.
It's recommended to find a balance between the desired level of detail and the performance requirements of your project. Experiment with different values to determine the optimal number of vertices per curve that provides sufficient detail while maintaining acceptable memory usage and processing speed.
Remember that the total number of vertices in the generated mesh will be the product of the number of curves and the number of vertices per curve. Keep this in mind when working with complex scenes or large numbers of curves to ensure that the resulting mesh remains manageable and efficient. Thankfully the quick iterative nature of this tool will allow you adjust quickly and edit your creations in a non destructive way.